TableGen
Import your spreadsheets, PDF and Word document into Revit as Legend Views, Schedule Views and Drafting Views. Collaborate with non-Revit users and bring the beauty of your Excel Tables, PDF and Word documents into Revit.
Table of contents
- TableGen
TableGen
There are three main ways to import files with TableGen. Each has different results in terms of visual fidelity and model weight.
-
Image import (Excel, Word, PDF) - Imports the content as images into a Legend or Drafting view, allowing you to set the resolution (DPI).
-
Table import into Legend or Drafting view (Excel) - Converts the Excel table into Revit elements (text and linework).
-
Table import into Schedule (Excel) - Places the data into the schedule header section.
Add files
The first step is to add the files you want to import. You can do this in multiple ways:
-
Drag & Drop - Drag one or more supported files from Windows Explorer and drop them into the main TableGen grid.
-
Add Table - Click the “Add Table” button and use the file dialog to select one or more supported files.
-
Browse link (“click here to browse”) - Opens the file dialog and allows you to select one or more supported files.
Note: the version on the image may not reflect the latest version of TableGen/DiRootsOne.
Worksheet Selection Window
Once you drop or select the files to add, the worksheet selection window opens and lets you create multiple views in one operation by selecting which worksheets (and which region in each worksheet) should be imported. It also allows defining the default properties that will be applied to the new views.
-
Files table: Each added file is displayed here, you can use the context menu to switch between relative and absolute paths.
-
Excel files can be expanded to view and configure their worksheets.
-
Worksheet selection: Use the checkboxes to choose which worksheets will be imported.
-
Region selection: For each worksheet, use the dropdown to pick the source range: Named Region, Print Area, or Used Range.
-
-
Word and PDF files cannot be expanded, but the view count field is editable, allowing you to create multiple views for the same file (you can edit the pages later).
-
Default View Properties: Set the properties to be applied to every view created from this selection. The available properties are: Type (Table/Image), View Type (Legend/Drafting/Schedule), View Scale, and Black and White.
-
Search: You can use the search bar at the top to filter files by file name or path.
-
When pressing “Ok”, the views will be added to TableGen. The default view name will be the name of the Worksheet (Excel files) or the file name (Word/PDF).
Note: the version on the image may not reflect the latest version of TableGen/DiRootsOne.
Named Regions in Excel
Named regions allow you to specify the range that you want to import into Revit. To create them follow these steps:
-
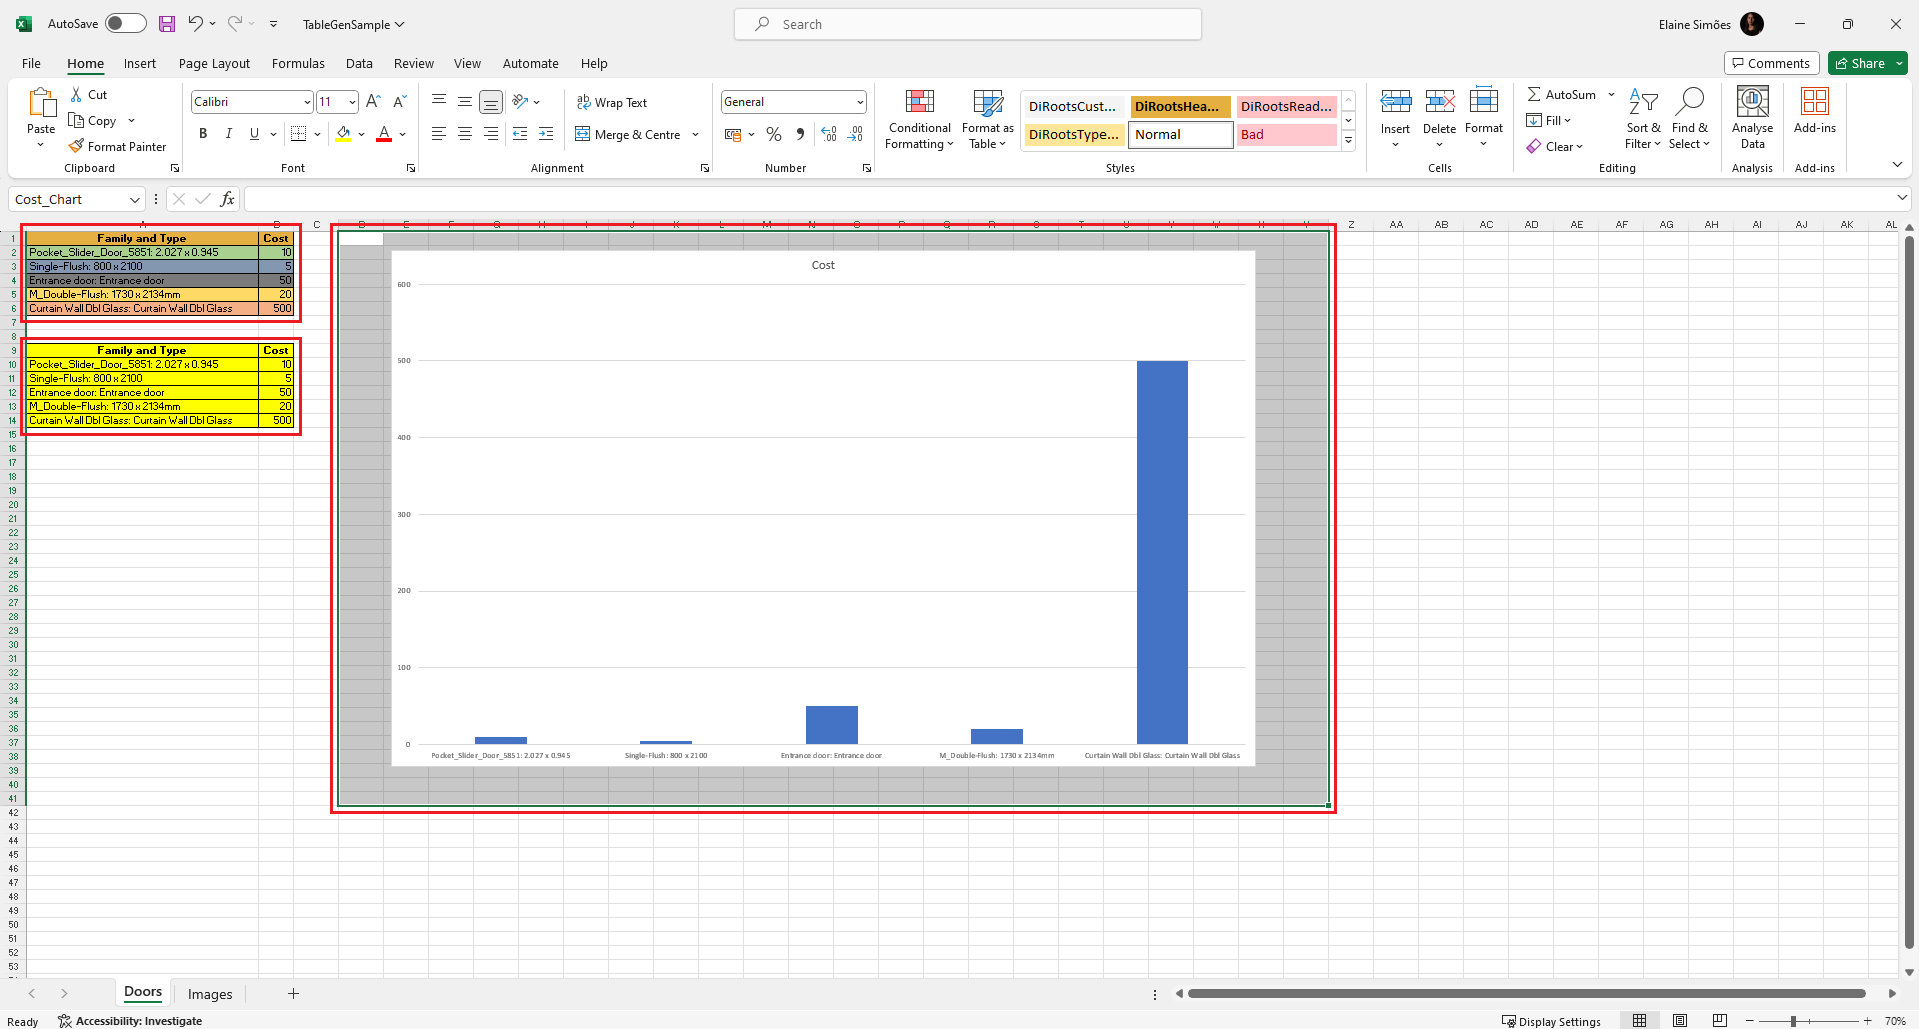
In the worksheet you want to import, select the desired range of cells, and then choose a name and type it in the Name Box - located to the left of the formula bar (see image below). After creating the named region, save the Excel file to import it.
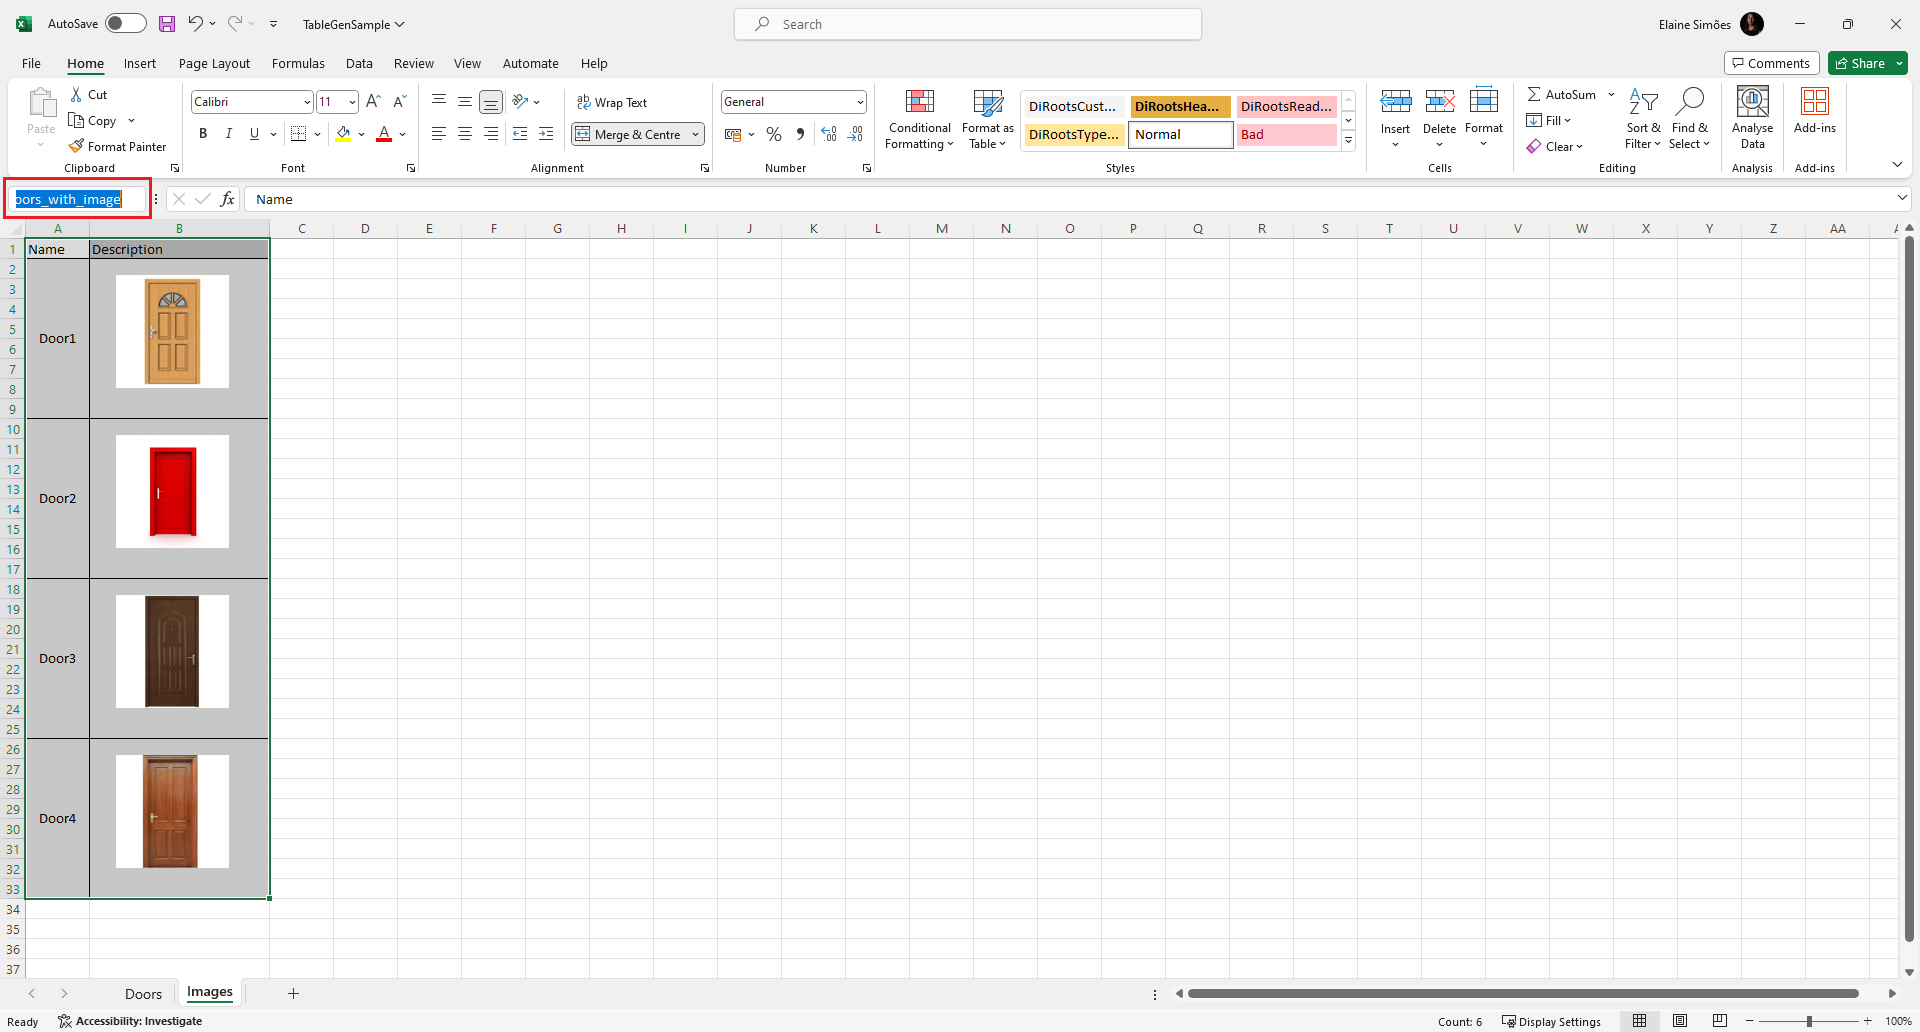
Note: the version on the image may not reflect the latest version of TableGen/DiRootsOne. -
You can also create multiple worksheet regions, and each one can be individually imported into Revit.
Note: the version on the image may not reflect the latest version of TableGen.
Advanced Mapping & Formatting
Advanced Mapping settings provide greater control over how Excel data is converted into Revit documentation.
Use these settings to align imported tables with office standards, control style creation, preserve Revit formatting during updates, and define how units and formatting should be displayed.
Use Advanced Mapping
If you have existing views in TableGen, Use Advanced Mapping is disabled by default to prevent affecting those views.
Enabling Use Advanced Mapping activates Line/Text Styles and Update Behavior features.
 Note: the version on the image may not reflect the latest version of TableGen/DiRootsOne.
Line & Text Mapping
Line & Text Mapping controls how imported Excel borders and text styles are converted into Revit styles.
Once at least one Excel file is imported, the line and text styles detected from the source Excel file appear in the Line Styles and Text Styles tabs of the Global Settings window.
Line Styles
The Line Styles tab displays the border styles detected from the source Excel file.
For each Excel line style, TableGen shows:
- Excel Style
- Color
- Revit Style
Use the Revit Style dropdown to map each Excel line style to the desired Revit line style.
This allows imported table borders to follow the line styles already available in the Revit project.
 Note: the version on the image may not reflect the latest version of TableGen/DiRootsOne.
Text Styles
The Text Styles tab displays the text styles detected from the source Excel file.
For each Excel text style, TableGen shows:
- Font
- Color
- Size (pt)
- Bold / Italic
The mapping options allow you to control how these Excel text styles are applied in Revit.
You can manage:
- Legend / Drafting Text Style
- Schedule Font Size
Use these options to map imported Excel text to the desired Revit text styles and control the text size used in Schedules.
 Note: the version on the image may not reflect the latest version of TableGen/DiRootsOne.
Update Behavior
Update Behavior controls how imported views are refreshed when the source Excel file changes.
-
Recreate View - Updates both the data and formatting from the source Excel file. Use this option when the Excel file is the source of truth for both content and formatting.
-
Update Data Only - Updates the data while preserving the formatting applied in Revit. When enabled, TableGen updates the cell values from Excel and retains Revit-side formatting, including:
- Text styles
- Line styles
- Colors
- Column widths
- Row height
- Image positions
- Other formatting changes made in Revit
Use this option when Excel data changes frequently, but the appearance of the view has already been adjusted to match project or office standards.
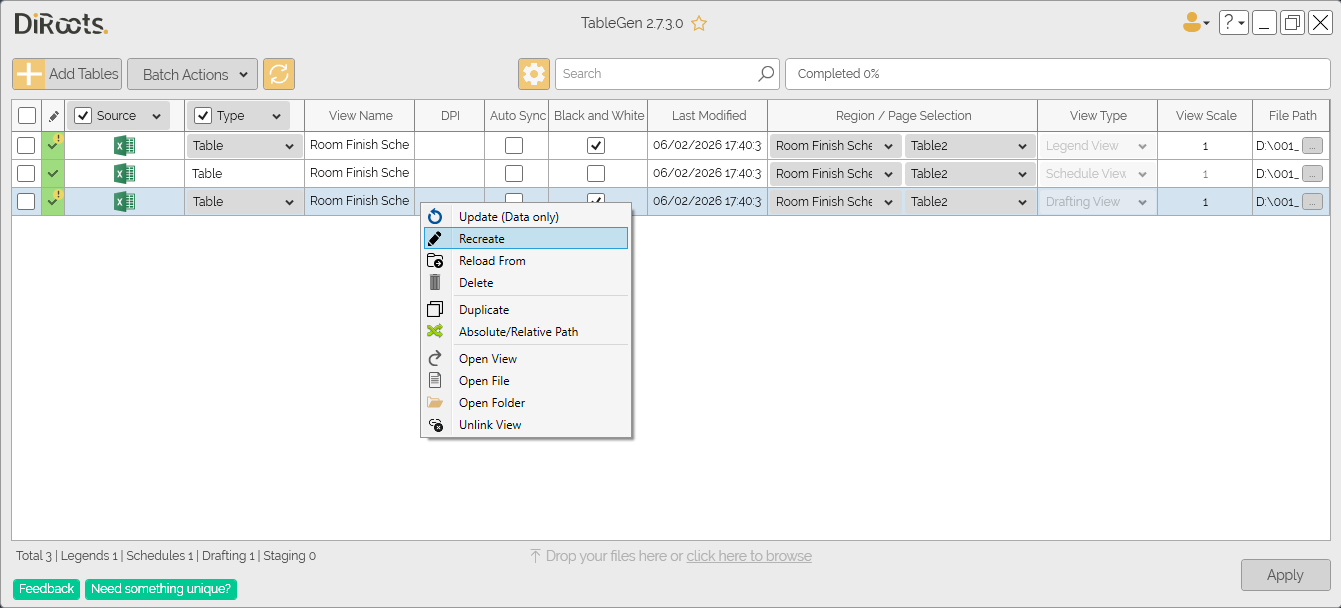
The Recreate option appears in the context menu when Update Data Only is enabled in Global Settings and you need to recreate the view.
 Note: the version on the image may not reflect the latest version of TableGen/DiRootsOne.
Black & White Settings
Black & White Settings control how colors from the source Excel file are converted when creating or updating views with the Black & White option enabled.
These settings can be applied separately to text and lines, and to cell backgrounds.
Text & Lines
Controls how text and border colors are processed.
-
Convert All Colors to Black - Converts all text and line colors from the source Excel file to black.
-
Keep White and Grays - Converts colored text and lines to black while preserving existing white and grayscale colors.
-
Convert Colors to Grayscale - Converts all text and line colors to their grayscale equivalents.
Backgrounds
Controls how cell background colors are processed.
-
Remove All Backgrounds - Removes all cell background colors from the imported view.
-
Keep Grays, Remove Colors - Removes colored backgrounds while preserving existing grayscale fills.
-
Convert to Grayscale - Converts all background colors to grayscale equivalents.
 Note: the version on the image may not reflect the latest version of TableGen/DiRootsOne.
Decimal Symbol & Digit Grouping
Decimal Symbol & Digit Grouping controls how numeric values are formatted when imported into Revit.
These settings allow imported tables to follow either the operating system settings or the formatting rules defined in the current Revit project.
Use System Settings
Uses the decimal symbol and digit grouping settings configured in the operating system.
This option is useful when imported tables should follow local or regional formatting standards defined on the user’s computer.
Use Document Settings
Uses the decimal symbol and digit grouping settings defined in the current Revit document.
This option is recommended when imported tables should match the formatting standards used throughout the project documentation.
Manage imported tables
The main grid is the central place to review and edit all imported tables. Each row represents a view and can be configured directly inline.
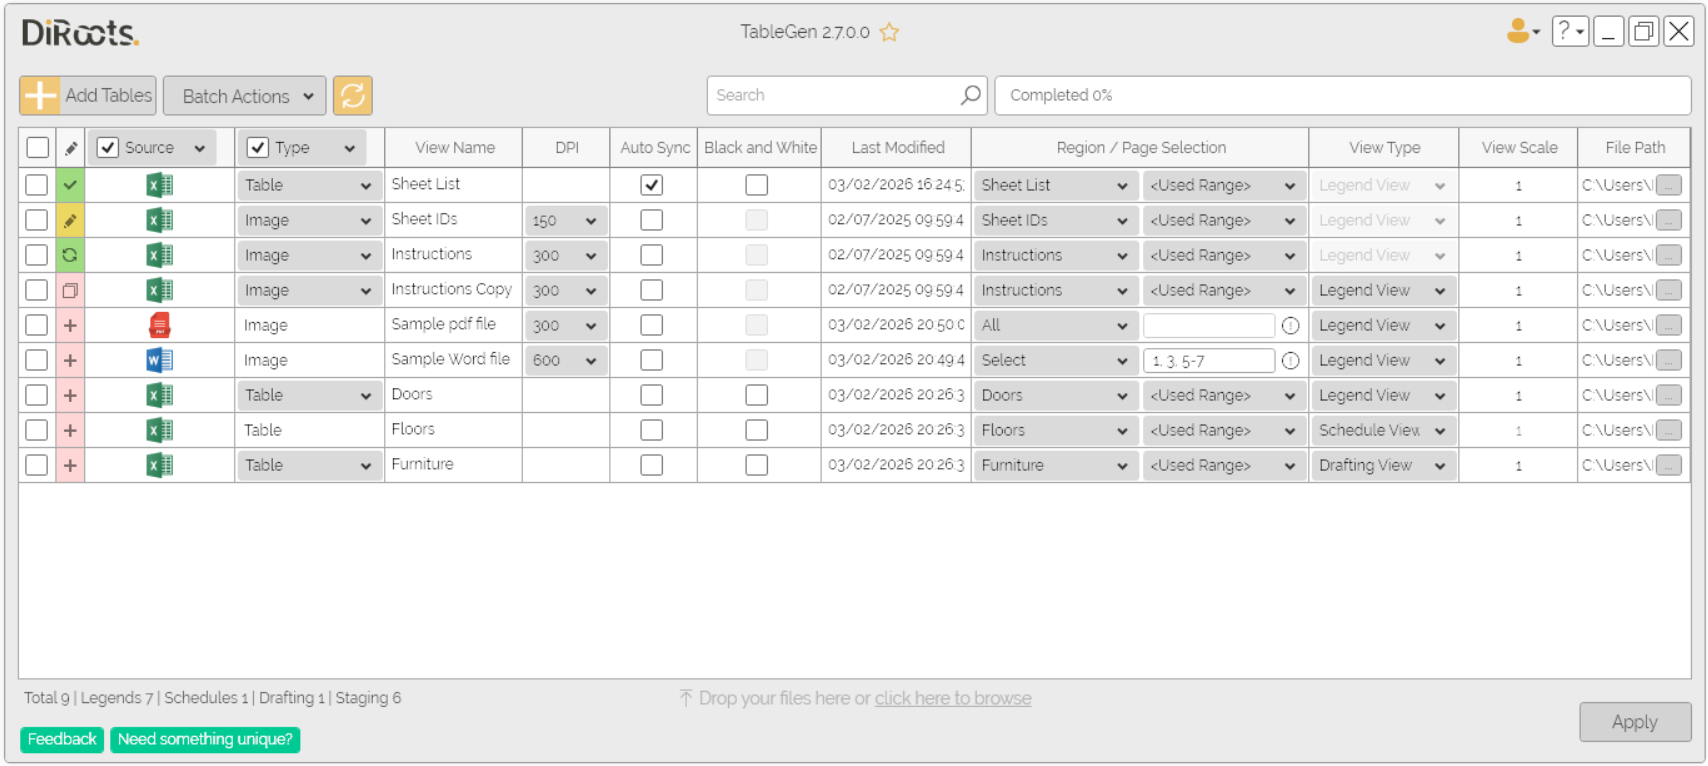
Note: the version on the image may not reflect the latest version of TableGen/DiRootsOne.
-
Checkbox - selects rows for batch operations. Check the header checkbox to select or deselect all rows at once.
-
Status - indicates the current state of each entry. Hover over the icon for a tooltip description.
-
Source - shows the file type (Excel, Word, PDF). Use the column header dropdown to filter by file type.
-
Type - toggles between Table and Image import mode. Use the column header dropdown to filter by type. Word and PDF files only support Image mode.
-
View Name - the name of the Revit view that will be created or updated. Click to rename it directly.
-
DPI - sets the image resolution. Only active for Image type entries.
-
Auto Sync - when enabled, this view will automatically be updated if there are changes to the file. It triggers whenever the Revit model is opened.
-
Black and White - removes all color formatting on import (text and borders become black, backgrounds transparent). Only available for Table type entries.
-
Last Modified - shows the last modified date of the source file.
- Region / Page Selection - for Excel files, two dropdowns let you select the worksheet and the named region or range. For Word and PDF files, use the first dropdown to choose All pages or a custom selection.
# Note: When using custom page selection, type page numbers and/or page ranges separated by commas, counting from the start of the document. For example, typing "1, 3, 5-7" will add pages 1, 3, 5, 6, and 7 as images. -
View Type - the Revit view type to create: Legend, Drafting, or Schedule. Cannot be changed after the view has been created in Revit.
-
View Scale - sets the scale of the Revit view.
- File Path - shows the path to the source file. Can be toggled between absolute and relative path via the context menu or batch action.
Batch Actions
The “Batch Actions” dropdown allows you to perform various actions on multiple views at once. To use them, check the desired views using their checkboxes and then click the action.
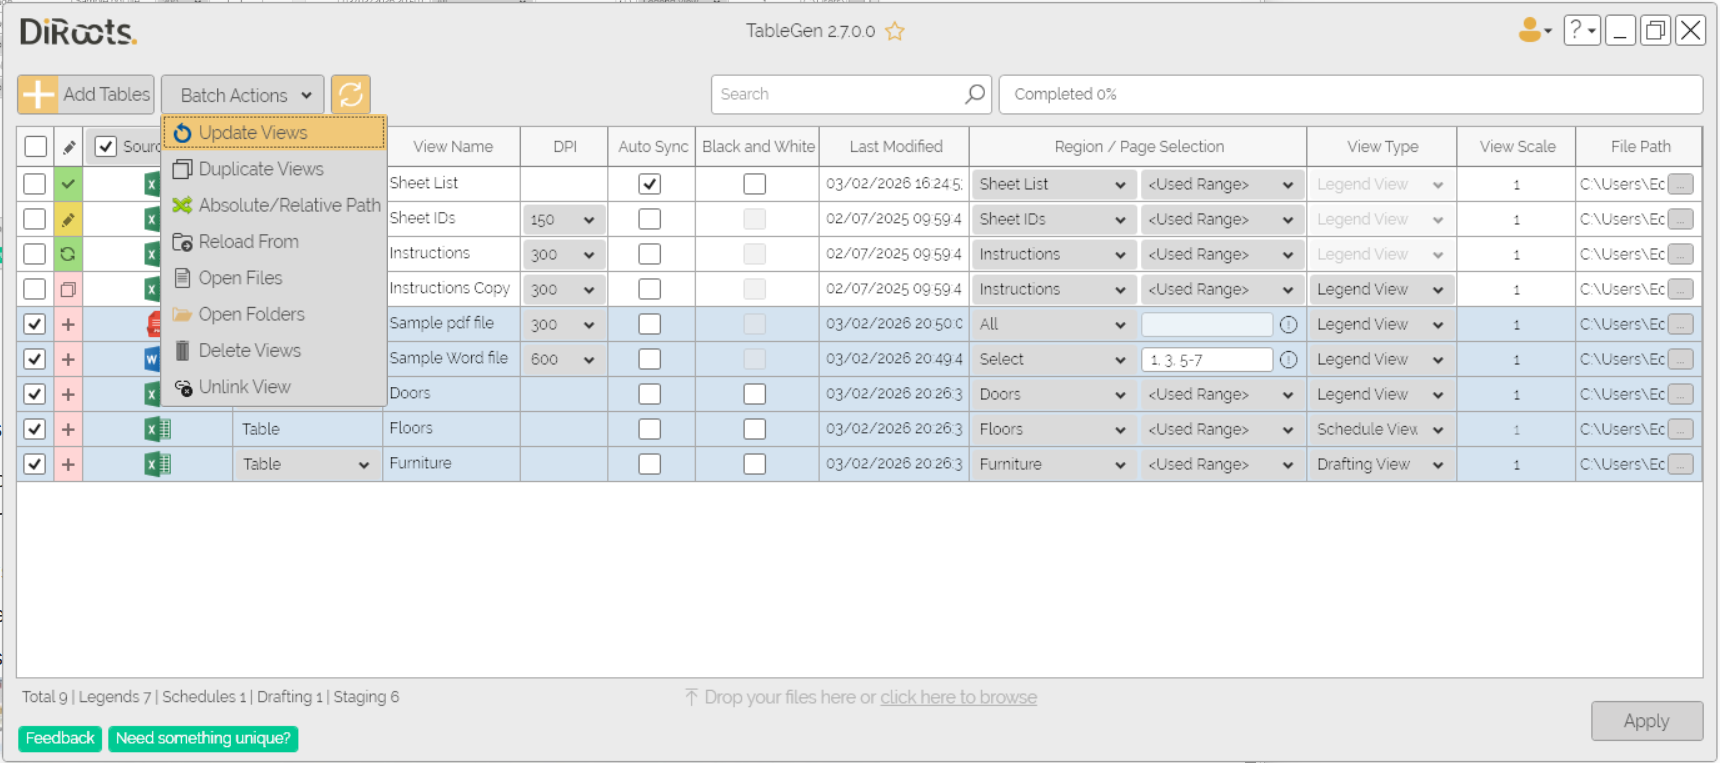
Note: the version on the image may not reflect the latest version of TableGen/DiRootsOne.
-
Update Views - redraws the linked Revit views using the source file.
-
Duplicate Views - creates a copy of the selected views.
-
Reload From - relinks the selected views to a new file location. When a single view is selected, you are prompted to choose a file. When multiple views are selected, you are prompted to choose a folder, and each file is matched by name within that folder. Useful when source files have been moved or reorganized.
-
Absolute/Relative Path - toggles the file path format for the selected entries.
-
Open Files - opens the source files in their default application.
-
Open Folders - opens the folders containing the source files.
-
Delete Views - removes the selected views from Revit and from the TableGen grid.
-
Unlink View - removes the link to the Revit view and deletes the TableGen entry.
The context menu, accessible by right-clicking on any row in the grid, allows you to run the same commands on the currently selected rows. It also has an additional command:
- Open View - opens the view in Revit
Tables synchronization
Refresh table
Click the Sync button to refresh the information displayed in the grid, updating the Last Modified date, available Worksheets, and Regions for each entry. This does not update the Revit views themselves.
Auto Sync
The Auto Sync checkbox, available for each view in the main grid, enables automatic synchronization. When enabled, the view will be automatically updated in Revit when the model is opened, if changes are detected in the source file.
Black and White – Remove color formatting
Use this option to ignore all Excel colors when importing tables, keeping the result black and white. Where to find it:
- Checkbox Column in the main window (“Black & White”)
- In the Worksheet Selection window, in the Default View Properties, a checkbox labeled “Black & White – Remove color formatting”.
What it does when enabled:
- Converts all text to black
- Converts all borders to black
-
Removes cell background colors (background becomes transparent)
Note: the version on the image may not reflect the latest version of TableGen/DiRootsOne. —
If you want to find out more about TableGen and explore detailed tutorials on how to use it, visit our YouTube channel. There, you’ll find a series of videos that can help answer questions and improve your knowledge. Be sure to check it out and subscribe to keep up to date with our news and tips!